
While using your Mac, you might suddenly encounter the dreaded "Your disk is almost full" prompt. You open System Settings to inspect storage usage, only to discover that the nebulous grey bar labeled "System Data" is taking up 60GB, 100GB, or even 150GB of your internal drive.
Your actual photos, documents, and installed applications barely account for a fraction of that size. The frustrating part is that System Data is not a regular folder you can simply double-click and clean up in Finder. Online searches often point to sponsored articles pleading with you to buy subscription cleaner software.
You do not need to pay for commercial cleaner utilities. The explosive growth of macOS System Data almost always stems from a few predictable culprits: forgotten APFS local snapshots, user library application caches, and developer build leftovers. Here is how to safely purge them using built-in tools.
The Prime Suspect: Hidden Time Machine Local Snapshots
By far the most common reason System Data balloons into astronomical numbers is Time Machine Local Snapshots. This frequently strikes MacBook users who disconnect their external backup drive and only plug it in once every few days or weeks.
Under the APFS file system, when your scheduled backup time arrives and your external hard drive is disconnected, macOS does not skip a beat. Instead, it quietly saves differential backup snapshots directly onto your internal SSD. These snapshots are supposed to be flushed once the backup drive connects, but in the meantime, macOS catalogs every byte under "System Data".
To inspect whether your Mac is hoarding these hidden snapshots, open Terminal via Spotlight (Cmd + Space) and run:
tmutil listlocalsnapshots /
If you see a long list of dates such as com.apple.TimeMachine.2026-09..., snapshots are consuming gigabytes of your precious storage. You can force macOS to purge and thin these snapshots with this single command:
tmutil thinlocalsnapshots / 10000000000 4
This command instructs the kernel to reclaim at least 10GB of storage aggressively. After several seconds, messages stating "Deleted local snapshot" will appear, instantly releasing held blocks back to your free space pool.
Note — Seeing com.apple.os.update snapshots?: If your output only lists entries starting with com.apple.os.update-... or com.apple.os.update-MSUPrepareUpdate, these are APFS sealed software update snapshots rather than Time Machine backups. tmutil cannot delete them. They will automatically vanish once you complete pending macOS updates in System Settings and restart. In this case, proceed directly to the user cache cleanup below.
Ghost Caches in Your User Library
If snapshots were not the issue, the next place to look is your user-level Caches folder. Dragging an app to the Trash does not automatically eliminate its cached web data, render scratch files, or downloaded assets.
Web browsers (Google Chrome, Edge), communication clients (Slack, Discord, KakaoTalk), and media editing software routinely stash tens of gigabytes in background folders.
Switch to Finder, press Cmd + Shift + G (Go to Folder), paste the following path, and press Enter:
~/Library/Caches
While navigating in Finder works well, if you are comfortable in Terminal, running this single purge command is significantly faster:
rm -rf ~/Library/Caches/*
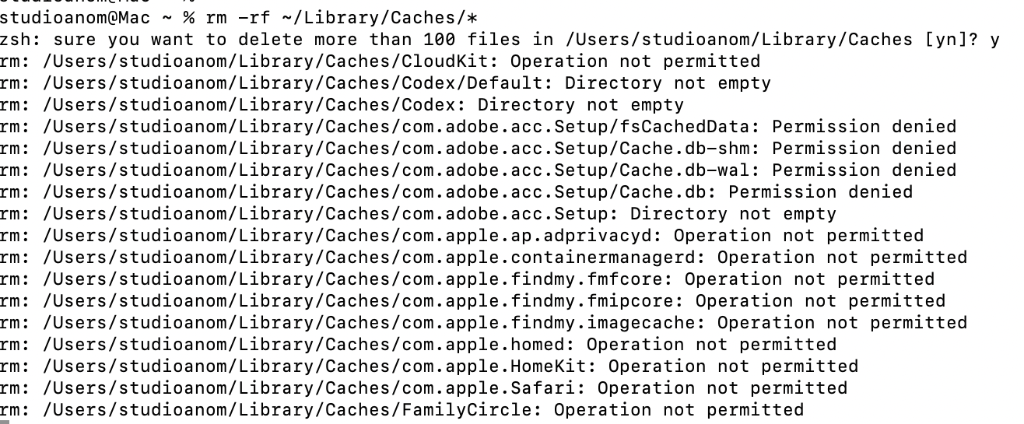
Upon hitting Enter, zsh will pause with a confirmation prompt: sure you want to delete more than 100 files in ... [yn]?. Type y and press Enter. You will likely see a cascade of messages like Operation not permitted for CloudKit and Safari, along with Directory not empty for active apps.
Do not be alarmed—this does not mean the cleanup failed. macOS System Integrity Protection (SIP) intentionally bars shell scripts from tampering with core Apple services, and open software locks its active cache databases. Crucially, all the ballooning bloat from third-party browsers, electron apps, and web scrapers was silently eradicated in the background.

Here is the real-world confirmation using df -h /System/Volumes/Data. Prior to clearing the cache, internal storage was strained at 371Gi used and a razor-thin 20Gi available (95% capacity). Immediately following the purge, available space surged to 39Gi, successfully restoring roughly 19GB of pure storage and dropping capacity to 91%.
Because background processes take a minute or two to release locked file descriptors, we recommend waiting a brief moment and running df -h again to see the full extent of the freed-up disk space.
Forgotten Build Leftovers for Creators and Developers
If you write code or compile projects in Xcode, a colossal portion of your System Data is likely Xcode DerivedData and leftover iOS Simulator runtimes. Over months of building, this single directory can balloon past 80GB.
Wipe clean Xcode's intermediate build artifacts using Terminal:
rm -rf ~/Library/Developer/Xcode/DerivedData
Similarly, if you use Docker Desktop on macOS, remember that closing containers does not shrink the virtual disk image (Docker.raw). Open Docker Desktop settings and perform a "Purge data" command to reclaim unallocated disk blocks.
Why Storage Does Not Update Immediately
After running these commands and clearing caches, you might notice that the System Data bar in System Settings does not shrink instantaneously. macOS takes time to recalculate APFS directory structures and update its Spotlight index.
The most dependable final step is to restart your Mac. Rebooting flushes stale swap files, clears kernel caches, and forces macOS to recalculate free space accurately.
There is no reason to sign up for recurring cleaner software subscriptions. Checking APFS local snapshots and user library caches with native commands gives you full control over your Mac without paying a dime.